Getting Started – What you need

There are some essential items that you will need for your trip.

GUIDE BOOK

As I said before, the Kev Reynold’s book Chamonix to Zermatt, the Classic Walker’s Haute Route is an absolute necessity.  With this in hand, you probably don’t need to buy extra maps, although we found them useful in giving a bigger picture and showing alternate trails.  Kev is very specific in his directions, and takes pains to update the description with new editions.  That being said, make sure that you have the latest version!

There are tons of trails all over the Alps, and the Alpine Clubs do a great job of maintaining extensive signage.
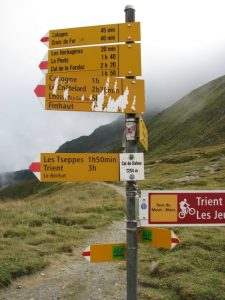
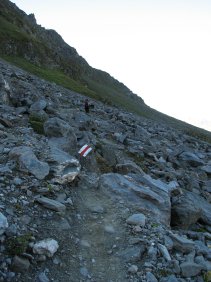
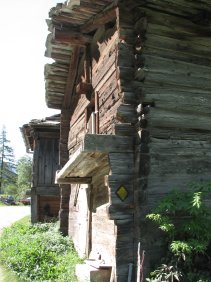
You can usually tell where you are and where you need to go, and Kev’s descriptions are fantastic.  These yellow signs are at every junction, and when trails are over rocks or through towns, you will see blazes painted on rocks and buildings to help direct you along the way.
Throughout this account you will notice that we have some disagreements with “Kev time” – the amount of time the guide book tells you it will take to complete the hike.  He clarifies that this is just walking time – no breaks or lunch or stopping to take photos is counted.  I wish we had kept track of our timing, to provide another (slower) perspective that does include those necessary stops.  However, to be fair, his times were pretty similar to what was posted on the signs.  Neither seemed very realistic.   For example, one day Kev offers two alternatives to get from the Cabane de Prafleuri to Arolla – one is the route we took, over Col de Riedmatten (an adventure you’ll enjoy further on) or via Cabane des Dix and over the Pas de Chevres (involving ladders bolted into vertical rocks – no thanks!).  He suggests that it will take the same amount of time to do either one – 6.5 hours, and claims that the second route is just a kilometer longer.  Looking at the maps, and having been there and seen it, I can’t believe it!

So – whining aside – though it did often take us longer than the signs or the book suggested, we always made it to our final destination long before dark – and usually with an opportunity to rest and take a shower before supper.  Our latest arrival was still just around 6:30 in the evening.  We tended to have a more leisurely morning than most: usually on the road between 8:00 or 9:00 am, whereas most others were out the door between 7:00 and 8:00 am.

MAPS

If you are interested in having maps, you can find them online or wait to buy them in France and Switzerland.  We ordered maps ahead of time because I am just that type of person 🙂  We did see the same maps at tourist shops all along the route, but I’ll be honest that I didn’t check to see if each store had what we might have wanted at that particular stage of the journey.  Nothing in Switzerland is cheap, so I doubt that you would really save by waiting and purchasing maps once you got there.

You should be careful what you buy because the maps that you want have the letter “T” after the map number, indicating that trails are shown.  Without those, there isn’t much point in having them.  I found the maps at Omni Maps.  You will need all five maps in order see the entire route from Chamonix to Zermatt.  The maps are Martigny (282T), Arolla (283T), Montana (273T), Visp (274T) and Mischabel (284T).

EQUIPMENT

What you will need to purchase likely depends on whether you do much backpacking already.  However, if you haven’t done much hiking or other strenuous climbing activities, this is likely not the trip for you!  The first half of the route can be challenging – especially if you’re not into semi-vertical climbing.  Look for an easier route (I’ve heard that Tour de Mont Blanc is less difficult, but can’t vouch for that).

I found a packing list from a company called Distant Journeys that offers guided and self-guided trips of the Haute Route, and think it might helpful – though having backpacked before, the list was pretty standard.  I’ve put our detailed list, including what we wished we’d done differently and actual pack weights for both packs at the end of this article.  We carried EVERYTHING we would need for the entire trip, including a couple of city days in Basel.  If you plan to spend much time traveling after the hiking, you might want to pack a separate bag that you send/store at the rail station to pick up after your hike (it costs the price of a rail ticket to do so).

We purchased smaller backpacks than what we normally use for a week long trip requiring tents, food and full sleeping bags.  We love bargains, so I generally look for equipment at Sierra Trading Post – and that’s where I found our 40 liter La Fuma packs.  We also bought sleeping bag liners to use at dortoirs.  Bedding at the huts and dortoirs are NOT changed between users, so you’ll definitely want some kind of lightweight sleep sack to climb into for the sake of hygiene.

Other than that, I don’t think we purchased much else.  We had hydration systems (Camelbaks) already, all the clothing that we needed (although I did take advantage of the trip to buy a super-lightweight rain coat that I loved!).  One highly recommended item is a couple of disposable plastic food containers (like Gladware) to put your lunch items in.  We got 2 pint-sized tubs that were perfect for storing cheese, meat or fruit along with some Ziploc bags.

Another suggestion to help out along the way: I carried with us a spreadsheet with our trip and all of the contact information for our accommodations.  This proved very helpful and also provided a single spot to save email addresses and contact information for people we met during our hike.

A thing about cell phones: we purchased a phone that we knew would work in Europe and we were glad to have it many times.  Having hiked in the Sierras, Glacier and the Tetons, it felt odd to have the ability to make a call from high up on a mountain, but the coverage was there!  It was fun to text the kids as to our progress without using up too much time.  However, we found that the phone was not able to send or receive text messages from people we met along the way.  I’m not sure what the barrier was, but be aware that you might have limitations in communicating with European long-distance numbers.

Here is what my pack looked like unpacked:
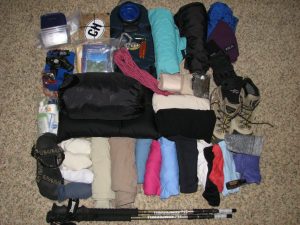
and packed:
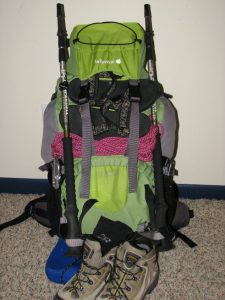
Here is a list of what we would do differently, how much the packs weighed and what was in each of our packs, excluding the following items.  I subtracted the unwanted items from my pack weight because they were significant in their contribution to total weight; Barry’s unwanted items just weren’t that heavy. (Katie/left, Barry/right):

Items I wish I hadn’t brought:

Windstopper/fleece jacket – Mountain Hardware: I could have achieved same with layering under my rain jacket

GPS: didn’t have Switzerland maps available and Cicerone book/maps were more than adequate

as many socks: I just needed 2 Patagonias and another set of sock/liners – but I packed for options in case I had boot trouble

Hiking sticks: just found these to be more of a burden than a help (this was his personal perspective; I won’t hike without them!)

Items I wish I had brought:

Lightweight pants for city/wash days

warm gloves (somehow left these behind)

Needles in first aid kit (for blisters)

charger for cell phone

Total Pack Weight

21 lbs (without water and items I wish I hadn’t brought) – but this includes all items except boots, and I would have been wearing one day’s worth of clothes…

25 lbs (without water but including items I wish I hadn’t brought) – again this includes all items except boots, and I would have been wearing one day’s worth of clothes…


Katie’s pack

Barry’s pack

Lafuma Nanga 40 – Ventilight System

Lafuma Nanga 40 – Ventilight System

Sleeping bag liner – Alps Mountaineering “Butterfly”

Sleeping bag liner – Alps Mountaineering “Butterfly”

Rain pants – Marmot

Rain pants – Sierra Designs

Rain jacket – Arcteryx Beta SL

Rain jacket – Equinox

warm gloves – Seirus

wind jacket – Insport

warm fleece hat – Bula

warm fleece hat

water proof rain/sun hat – Marmot

wool brimmed hat

hydration system – Camelbak 100 oz

hydration system – Camelbak 100 oz

Goretex boots – Asolo

Leather boots – Alico

gaters – Outdoor Research

gaters – REI

2 pair zip-off pants (Ground & Mountain Hardware)

2 pair zip-off pants with liners (no underwear needed) – Ex Officio

2 short sleeve poly shirts (Mountain Hardware & Terramar)

2 short sleeve poly t-shirts

Mid-weight fleece pullover – Gerry

Mid-weight fleece pullover – LLBean

quick dry button down longsleeve shirt – REI

quick dry button down longsleeve shirt – Columbia

lightweight thermal top – Hot Chillys

lightweight thermal top – Duofold

lightweight thermal bottom – Title Nine

lightweight thermal bottom – Marmot

3 pair travel underpants – Ex Officio

quick dry shorts with liner – Columbia

2 wicking sports bras – Champion

quick dry short-sleeved button up shirt – REI

mini down pillow

cotton pj bottoms

sandals – Teva

sandals – Teva

4 pair socks and 3 liners

4 pair socks and 2 liners

headlamp – Petzyl

headlamp – Petzyl

space/emergency blanket

space/emergency blanket

Hiking sticks – Komperdell

Hiking sticks – REI

paperback book

paperback book

MP3 player for flights

MP3 player for flights

camera and belt case

camera

Leatherman tool

jack knife

handkerchief

handkerchief

copies of passports & credit cards

Shared items: Katie

Shared items: Barry

compass

First Aid kit*

journal

toiletry items**

maps and Cicerone guide

Stuff sack for carry-on items (poles and knives)

small roll TP and hand cleaner

binoculars

toiletry items**

cards and dice game

30 feet rope and carabiner

extra batteries for lights and cameras

camp towel – Thermarest

cell phone

2-24 oz. Gladware containers, 2-1 qt and 2-1 gallon ziploc bags for lunch items


**Toiletry Items

2 tooth brushes, small tube toothpaste, dental floss

breathe-rights and ear plugs (for dortoire nights)

shampoo

shower gel

face lotion

body lotion

2 hair products

deoderant stick

1 razor, shaving cream

sunscreen

lip balm

hairbrush/mirror travel combo

OTC medications: (Aleve, antihistamines, decongestants, Zantac, melatonin, immodium, aspirin)

*First Aid Kit

povidone/iodine swabstick

variety of blister care products

bacitracin ointment

small ace wrap

3M medipore tape

3M microfoam tape

gauze wrap

variety of bandaids

gauze pads

extra shoe laces

Best Ever Waffles

Ingredients:

  • 1 1/3 c flour
  • 4 tsp baking powder
  • 1/2 tsp salt
  • 2 tsp sugar
  • 2 eggs, separated
  • 1/2 c butter, melted
  • 1 3/4 c milk

Directions:

  1. In a large mixing bowl, whisk together all dry ingredients.
  2. Separate the eggs, adding the yolks to the dry ingredient mixture and placing the whites in a small mixing bowl.
  3. Beat whites until moderately stiff; set aside.
  4. Add milk and melted butter to dry ingredient mixture and blend.
  5. Fold stiff egg whites into mixture.
  6. Ladle mixture into hot waffle iron and bake.

Yield: 6 servings (1 waffle)

Nutrition Facts:

  • Calories 313
  • Fat: 19.8 g
  • Carbohydrates: 26.7 g
  • Protein: 7.4 g


Dipped Gingersnaps+

Ingredients

  • 2 c sugar (+ extra for coating cookies)
  • 1 1/2 c oil
  • 2 eggs
  • 1/2 c molasses
  • 4 c flour
  • 4 tsp baking soda
  • 1 Tbsp cinnamon
  • 1 tsp salt
  • 1 pkg vanilla bark or chips

Directions:

Preheat oven to 350 degrees.

Combine sugar and oil, mix well.  Add eggs, beating well after each.  Stir in molasses.  Combine dry ingredients, add to the cream mixture.  Mix well.

Shape into 1/2″ balls and roll in sugar.  Place 2″ apart on ungreased baking sheet and bake for 10-12 minutes (they should be very lightly browned).  Cool.

Melt chips or bark over low heat.  Dip cookies halfway and place on waxed or parchment paper to harden.

Slow-Roasted Pulled Pork+

Ingredients

  • Pork:
  • 2 tablespoons dark brown sugar
  • 1 tablespoon smoked paprika
  • 1 tablespoon chili powder
  • 1 teaspoon salt
  • 2 teaspoons ground cumin
  • 1 teaspoon freshly ground black pepper
  • 1/2 teaspoon dry mustard
  • 1/2 teaspoon ground chipotle chile pepper
  • 1 (5-pound) boneless pork shoulder (Boston butt), trimmed
  • Cooking spray
  • 2 cups water, divided
  • 1/2 cup apple cider vinegar
  • 1/3 cup ketchup
  • Sauce:
  • 3/4 cup apple cider vinegar
  • 1/2 cup ketchup
  • 3 tablespoons dark brown sugar
  • 2 teaspoons smoked paprika
  • 1 teaspoon chili powder

Preparation

1. To prepare pork, combine first 8 ingredients in a small bowl. Rub sugar mixture evenly over pork. Let pork stand at room temperature 1 hour.

2. Preheat oven to 225°.

3. Place pork on the rack of a roasting pan coated with cooking spray. Pour 1 cup water in bottom of roasting pan. Place rack in pan. Bake at 225° for 1 hour.

4. Combine 1/2 cup vinegar and ketchup in a medium bowl; brush pork with ketchup mixture (do not remove from oven). Bake an additional 3 hours, basting every hour with ketchup mixture.

5. Pour remaining 1 cup water in bottom of roasting pan. Cover pork and pan tightly with foil. Bake an additional 3 3/4 hours or until a thermometer registers 190°. Remove from oven; let stand, covered, 45 minutes.

6. To prepare sauce, combine 3/4 cup vinegar and remaining ingredients in a small saucepan. Bring to a boil over medium-high heat, stirring occasionally with a whisk. Boil 5 minutes or until slightly thick. Shred pork with 2 forks. Serve with sauce. Serve shredded pork on hamburger buns with pickle chips, if desired.

Yield: 16 servings (3 oz pork and 1 Tbsp sauce)

Nutritional Information

Amount per serving
  • Calories: 283
  • Fat: 15.4g
  • Protein: 26.2g
  • Carbohydrate: 8.1g
  • Fiber: 0.4g

Quinoa with Toasted Pine Nuts+

Ingredients

  • 1 cup uncooked quinoa
  • 2 teaspoons extra-virgin olive oil
  • 2 tablespoons finely chopped shallots
  • 1 tablespoon minced garlic
  • 1 1/4 cups unsalted chicken stock (such as Swanson)
  • 1/4 teaspoon kosher salt
  • 1/4 cup pine nuts
  • 1 tablespoon extra-virgin olive oil
  • 1/4 cup chopped fresh parsley
  • 2 tablespoons chopped fresh chives
  • 1/4 teaspoon freshly ground black pepper

Preparation

1. Rinse and drain quinoa. Heat a large saucepan over medium-high heat. Add 2 teaspoons extra-virgin olive oil to pan; swirl to coat. Add shallots; sauté 1 minute or until tender. Add minced garlic; cook 1 minute, stirring constantly. Add quinoa; cook 2 minutes, stirring frequently. Add chicken stock and kosher salt; bring to a boil. Cover, reduce heat, and simmer 13 minutes or until liquid is absorbed and quinoa is tender.

2. While quinoa cooks, heat a large nonstick skillet over medium heat. Add pine nuts to pan; cook 3 minutes or until browned, stirring frequently. Combine quinoa mixture, pine nuts, 1 tablespoon extra-virgin olive oil, parsley, chives, and pepper; toss.

Serves 6 (1/2 cup)

Nutritional Information

Amount per serving

  • Calories: 187
  • Fat: 9.4g
  • Saturated fat: 1g
  • Sodium: 111mg

Moroccan-Spiced Meatball Tagine with Butternut Squash+

Meatballs:

  • 1 slice bread (trim crust perhaps)
  • (you might need additional bread crumbs – 1/2 c or so)
  • 1/3 c low fat milk
  • 1 lb ground lamb (original recipe was for beef)
  • 1 egg
  • 1/4 c chopped fresh cilantro
  • 2 garlic cloves, minced
  • 1/2 tsp ground cinnamon
  • 1/2 tsp ground cumin
  • 1/2 tsp ground coriander
  • 1/4 tsp ground ginger
  • 1/2 tsp freshly ground black pepper, divided
  • 1/2 tsp kosher salt, divided

Stew:

  • 1 Tbsp olive oil
  • 1 large onion, diced
  • 3 garlic cloves, minced
  • 2 cinnamon sticks
  • 1 tsp turmeric
  • 2 c low-sodium beef broth
  • 1 14.5 oz can diced tomatoes in juice
  • 3 c (1″) cubed butternut squash
  • 1 (5 oz) pkg baby spinach leaves

2 c cooked couscous (or quinoa)

Preheat oven to 400.  In a large bowl, soak the bread in the milk for 5 minutes.  Add the meat, egg, cilantro, garlic, cinnamon, cumin, coriander, ginger, 1/4 tsp pepper and 1/4 tsp salt; gently mix to combine.  Add bread crumbs if the mixture is too moist to handle.

Using moistened hands and 2 Tbsp for each, roll meat mixture into meatballs.  Arrange meatballs on a baking sheet.  Place in oven and bake until browned and just cooked through, about 15-20 minutes.  Remove and set aside.

Meanwhile, heat the oil in a heavy large pot over medium heat.  Add onions; saute until lightly browned, about 10 minutes.  Add garlic, cinnamon and turmeric and continue to cook, stirring, for another minute.

Add broth and tomatoes with juice, butternut squash and remaining 1/4 tsp each salt and pepper.  Bring to a simmer and cook until squash is just tender, about 20 minutes.

Add meatballs and spinach and gently stir into the stew.  Cook for another few minutes to rewarm meatballs and wilt spinach.  Remove cinnamon sticks.

Divide couscous or quinoa among 4 warm serving plates and top with the stew.

Traditional Spinach Artichoke Dip+

Not for the waist-watchers!

  • 2 c shredded parmesan cheese
  • 1 10 oz box frozen spinach, thawed
  • 1 14 oz can artichoke hearts, drained and chopped
  • 2/3 c low fat sour cream
  • 1 8 oz pkg 1/3 less fat cream cheese
  • 1/3 c light mayo
  • 2 tsp garlic, minced

Preheat oven to 375

Mix together parmesan cheese, spinach and artichoke hearts

Combine remaining ingredients and mix with spinach mixture

Bake 20-30 minutes (or more- depends on how thick your layer is)

Serve with crackers or toasted bread

Note: I reheated several times during course of party to keep warm and fresh

Mushroom Popover Pie+

  • 2 Tbsp butter, divided
  • 1/2 c finely chopped onion
  • 8 oz. white button mushrooms, stemmed and thinly sliced
  • 4 oz. shitake (or other) mushroom, stemmed and minced (or thinly sliced)
  • 1 tsp minced garlic
  • 1 tsp sea salt, divided
  • 1/2 tsp dried thyme
  • freshly ground black pepper
  • 3 large eggs,
  • 1 c low fat milk
  • 1 c flour

Preheat the oven to 375 with a rack in the center position.

Melt 1 Tbsp butter in a heavy skillet (one that can go into the oven) on medium-low heat.  Add the onion and cook, stirring, until it softens, about 5 minutes.

Add the mushrooms, garlic, 3/4 tsp salt, thyme and a generous amount of pepper; cook, stirring often, for about 15 minutes or until the mushroom’s liquid has been released and has evaporated in the skillet and the mushrooms are start to turn golden around the edges.  Remove from the heat.

Meanwhile, combine the eggs, milk, flour and the remaining 1/4 tsp salt in a blender; puree to form a smooth, aerated batter.

Transfer the mushroom-onion mixture to a bowl.  Rinse and dry the skillet, then return it to the stovetop over low heat.  Add the remaining Tbsp butter; once it has melted and begun to foam, immediately remove from the heat and swirl to coat the skillet.  Be sure the edges of the skillet are coated; this will ease removal after the popover has baked.  Add the mushroom-onion mixture, spreading it into a fairly even layer, then pour in the batter.

Transfer to the oven and bake for 25-30 minutes (I think it takes longer in my oven) until the batter is dry on top and feels solid when touched lightly.  The popover will be slightly puffed and its edges will have shrunk from the sides of the skillet and become quite brown.

Cut into wedges and serve hot or warm.

Note: this actually reheats pretty nicely; it is not as airy as a regular popover, the dough will remain a little creamy/custardy in texture

Serves 3-4

  • Calories: 280
  • Fat 11 g
  • Carbs 32 g
  • Protein 13 g

Lifetime’s Asian Tuna Salad

Dressing:

  • 1 1/4 c mayo
  • 1/4 c sesame oil
  • 2 Tbsp soy sauce
  • 2 Tbsp honey
  • 1 Tbsp chili powder
  • 1/2 tsp cayenne pepper
  • 1 Tbsp ginger powder
  • 1 1/2 tsp salt
  • 1 Tbsp black sesame seeds
  • 2 tsp crushed red pepper
1/2 c craisins
1/2 c finely shopped cilantro
1 c finely chopped carrots
1/2 c finely chopped green onion
1 pouch (size?) drained tuna

Whisk together the dressing ingredients.  Mix together with the remaining ingredients.

Roasted Squash Stuffed with Corn Bread Dressing*

  • Yield: 10 servings (serving size: 1 stuffed squash half)

Ingredients

  • 7 1/2 cups (1/2-inch) cubed Maple Corn Bread
  • Cooking spray
  • 5 acorn squash (about 1 pound each)
  • 4 cups boiling water, divided
  • 1 cup dried cranberries
  • 1/4 cup dried currants
  • 2 teaspoons olive oil
  • 1 cup finely chopped onion
  • 1 cup finely chopped celery
  • 1 cup finely chopped carrot
  • 2 tablespoons chopped fresh sage
  • 3 garlic cloves, minced
  • 1 cup vegetable broth
  • 1/4 cup chopped pecans, toasted
  • 2 tablespoons finely chopped fresh parsley
  • 3/4 teaspoon fine sea salt
  • 1/4 teaspoon black pepper

Preparation

Preheat oven to 400°.

Arrange corn bread cubes in a single layer on a jelly roll pan coated with cooking spray. Bake at 400° for 30 minutes or until corn bread is toasted, stirring twice. Set aside.

Decrease oven temperature to 350°.

Cut each squash in half lengthwise, and discard the seeds and membranes. Place the squash, cut sides down, in a 13 x 9-inch baking pan. Coat the squash with cooking spray. Pour 2 cups of boiling water over squash. Cover and bake at 350° for 20 minutes. Remove the squash from pan.

Place cranberries, currants, and 2 cups boiling water in a bowl. Cover and let stand 30 minutes. Drain.

Heat oil in a large nonstick skillet over medium-high heat. Add onion; saute 5 minutes. Add celery, carrot, sage, and garlic; saute 3 minutes.

Combine toasted corn bread cubes, cranberry mixture, onion mixture, broth, and remaining ingredients in a bowl, tossing to coat.

Spoon about 1 1/2 cups dressing mixture into each squash half. Place the squash halves in pan, cut sides up.

Bake at 350° for 30 minutes or until the tip of a knife pierces squash easily.

Totals include Maple Corn Bread.

Amount per serving

  • Calories: 398
  • Calories from fat: 23%
  • Fat: 10.2g
  • Saturated fat: 4.1g
  • Monounsaturated fat: 3.8g
  • Polyunsaturated fat: 1.6g
  • Protein: 6.5g
  • Carbohydrate: 74.2g
  • Fiber: 7.7g
  • Cholesterol: 16mg
  • Iron: 3.8mg
  • Sodium: 732mg
  • Calcium: 198mg